Sunday 15 November 2015

One for my oily skin girls! #bbloggers


Listen up my fellow Oily skinned girls, I know only too well the struggles of trying to keep your make up looking fresh through the day with an oily skin type.


I have always been a fan of Illamasqua Skin base, however my skin does start to look shiny within just a few hours of using it, I've also tried a a number of other foundations which all make my skin look oily far too soon after applying it for my liking.

However, I recently tried out Estee Lauder Double Wear foundation and I have to say I am in loveee with this stuff.
The foundation is a liquid form and is promoted at oily skin types as it is oil free, it is super long wearing, in fact I was told that Estee lauder actually produced one of its 3 in 1 cleansers specifically to remover double wear from the skin...it's that long wearing!


Coverage:

For me, the coverage is great, a little goes a long way and I don't need to conceal any areas further.
For those who like a really full coverage there is also the Double Wear Maximum Cover, this stuff is amazing! It might be 'too flawless' looking for an every day use for most people, but in my opinion it doesn't look heavy on the skin at all.

Application:

I apply mine with a Sephora airbrush brush but I don't buff, I just apply all over and then press in to make sure its seamless.
I then go over with a beauty blender to make sure it's seamless (because I'm just extra like that!)


I am the shade Cashew, but I can also get away with Shell Beige if I wanted to go fairer or Spiced Sand for a slightly more tanned tone.
For reference I am a Illamasqua Skin base 12, NC40 in MAC Studio Fix and 5 in MAC Matchmaster
Price runs at £30 for 30ml, not bad!


Remember, having an oily skin type keeps moisture in your skin, and will in turn keep it looking younger and keep those wrinkles away - so its not all bad after all is it! ;)

Sunday 8 November 2015

Winter Lip Lovin' #bbloggers

So, here we are at that wonderfully wintery time of year.
Personally I have a love hate relationship with this season, I adore winter fashion, layering up clothes and pulling out those well loved boots are some of my favourite things, but what this climate does to my skin is I find hard to deal with.

Lets start with the most exposed part of our skin, those lips! Now, unless you plan on wearing a balaclava all winter, its going to be hard to avoid exposing them to the elements.

As always, I like to back up anything I advise with a little fact (disclaimer: I'm obviously not a dermatologist, everything I talk about is from my own experience)

Fun Fact time: The skin on your lips is only up to 5 layers deep, compared to our face and bodies which have up to 5 times that. This is why our lips chap and bleed so easily! You've probably never paid attention to this, but your lips don't sweat, and nor do they produce their own sebum (basically oils) without this, our lips dry out quicker.


Queue the lip products, in my opinion a lot of these products can lead to what I like to call product addiction, which is basically when they have ingredients which actually irritate your skin and make you feel like you need the product when you stop using it (*Ahem Carmex*)

But there are some products which just put a bit of a barrier on the lips to lock in what moisture they do have! And they all live happily in my make up drawer, here they are....


5. Kheils Lip Balm -

This is a great lip moisturiser in terms of its moisture levels, but it is based from petroleum jelly a.k.a Vaseline! Which isn't such a bad thing in my opinion. This retails at £9.50 and can be purchased from Space NK or and Kheils store


4. Chanel Hydra Beauty Lip Care - 

This lip balm has a bit of a price tag but the amount of product you get for your money is fair. Personally I feel like it almost has a plumping effect although this isn't promoted as one of the properties. This product came recommended by Nina Ubhi, and anything she uses is obviously going to be good, right!?! This retails at £30 and can be purchased at most Chanel counters and independent Chanel Stores (Covent Garden & Brompton Road)


3. Dior Lip Glow - 

This comes in a hard stick form and has a firmer application making it that bit more long wearing, The colour is actually a pale pink but it comes up translucent on the skin. Pretty packaging too!  This retails at £24 and can be found at most Dior Counters


2. Eve Lom Kiss Mix - 

This one has a bit of a minty tingle and smell to it, although there’s no actual flavour. A great all rounder and it lasts on the lips due to its slightly sticky formula.This one retails at £16 from Space Nk stores


1. Charlotte Tilbury Lip Magic - 

My number one lip product has to be this one. Why? - because its main ingredient is propolis, in simple terms, propolis is natures anti septic, Bee's actually line the walls of their honeycomb with it in order to keep it sterile! I have always been a fan of this ingredient, in fact I have mentioned it in a previous post.You can get his one for £24 at Charlotte Tilbury counters in most department stores


Sunday 22 March 2015

FAVOURITE SERIES: NUDE LIP LINERS


As promised! My top nude lip liners.

Nude liners don't just have to go with nude lipstick, it's the most versatile colour you can have in your collection, it goes great under pretty much any lipstick to either block out the natural lip colour and change the colour of the lipstick, or just to mimic a false natural lip line!


From the top of the swatches below here's my list:
NYX - EVER
MAC - WHIRL
SEPHORA - CUTE CARAMEL
SEPHORA - RADIANT ROSY
MAKE UP FOREVER - 2C
RIMMEL - SPICE
NO7 - CARAMEL
NYX - CHOCOLATE
MAC - STRIPDOWN
CHARLOTTE TILBURY - ICONIC NUDE
MAC - SUBCULTURE


Saturday 21 March 2015

GET THE LOOK: R E G A L B R I D E

Behind the scenes...


I thought I would share the details of one of the recent looks I created, along with some raw behind the scenes images. I was going for a regal bridal look with simplistic jewellery as I wanted the eyes to do all of the talking.. I hope you like it as much as I do!

Here are the product details:

- Nars eye primer on the lid
- Maybelline Gel liner on the lid in brown blended out into the crease as a shadow base and crease colour base
- Mac 'Gold Stroke' pigment packed on top of the gel liner to the mobile lid
- Make Up Forever Matte Bronzer in the lid crease
- Illamasqua medium pencil on the water line (flesh tone)
- Illamasqua Obsidian eyeshadow buffed into the upper lash line to give a fuller lash effect
- Heavy smoked out lower lash line with the Nars - 'And God created women' palette
- Illamasqua Skin Base foundation 12 & 13
- Contour with Kryolan Supra Colours
- Mac sculpting powder in 'Sculpt' to emphasise the contour at the highest point of the cheekbones
- Femme Fetale Lashes in Samantha 

- Foundation set with Banana from the Anastasia Beverley Hills Contour Kit

- Anastasia Beverley Hills Dip brow in Medium Brown for a defined brow

- Illamasqua lipstick in Immodest mixed with Mac Love Lorn 


Make Up & Hair: Sharon Marway

Jewellery: www.deeya.co.uk

This image was created at the Nina Ubhi Beauty & Hair Institute

Saturday 17 January 2015

F A C E

My essential Face products!

These are all things I use on myself, and have done so for a long time, they have worked well for me according to the skin type I have. I want to share them not because I'm just preaching about how great they are, but like I always say, everything I buy is done so after much research and I'll only post things I know are worth raving about!


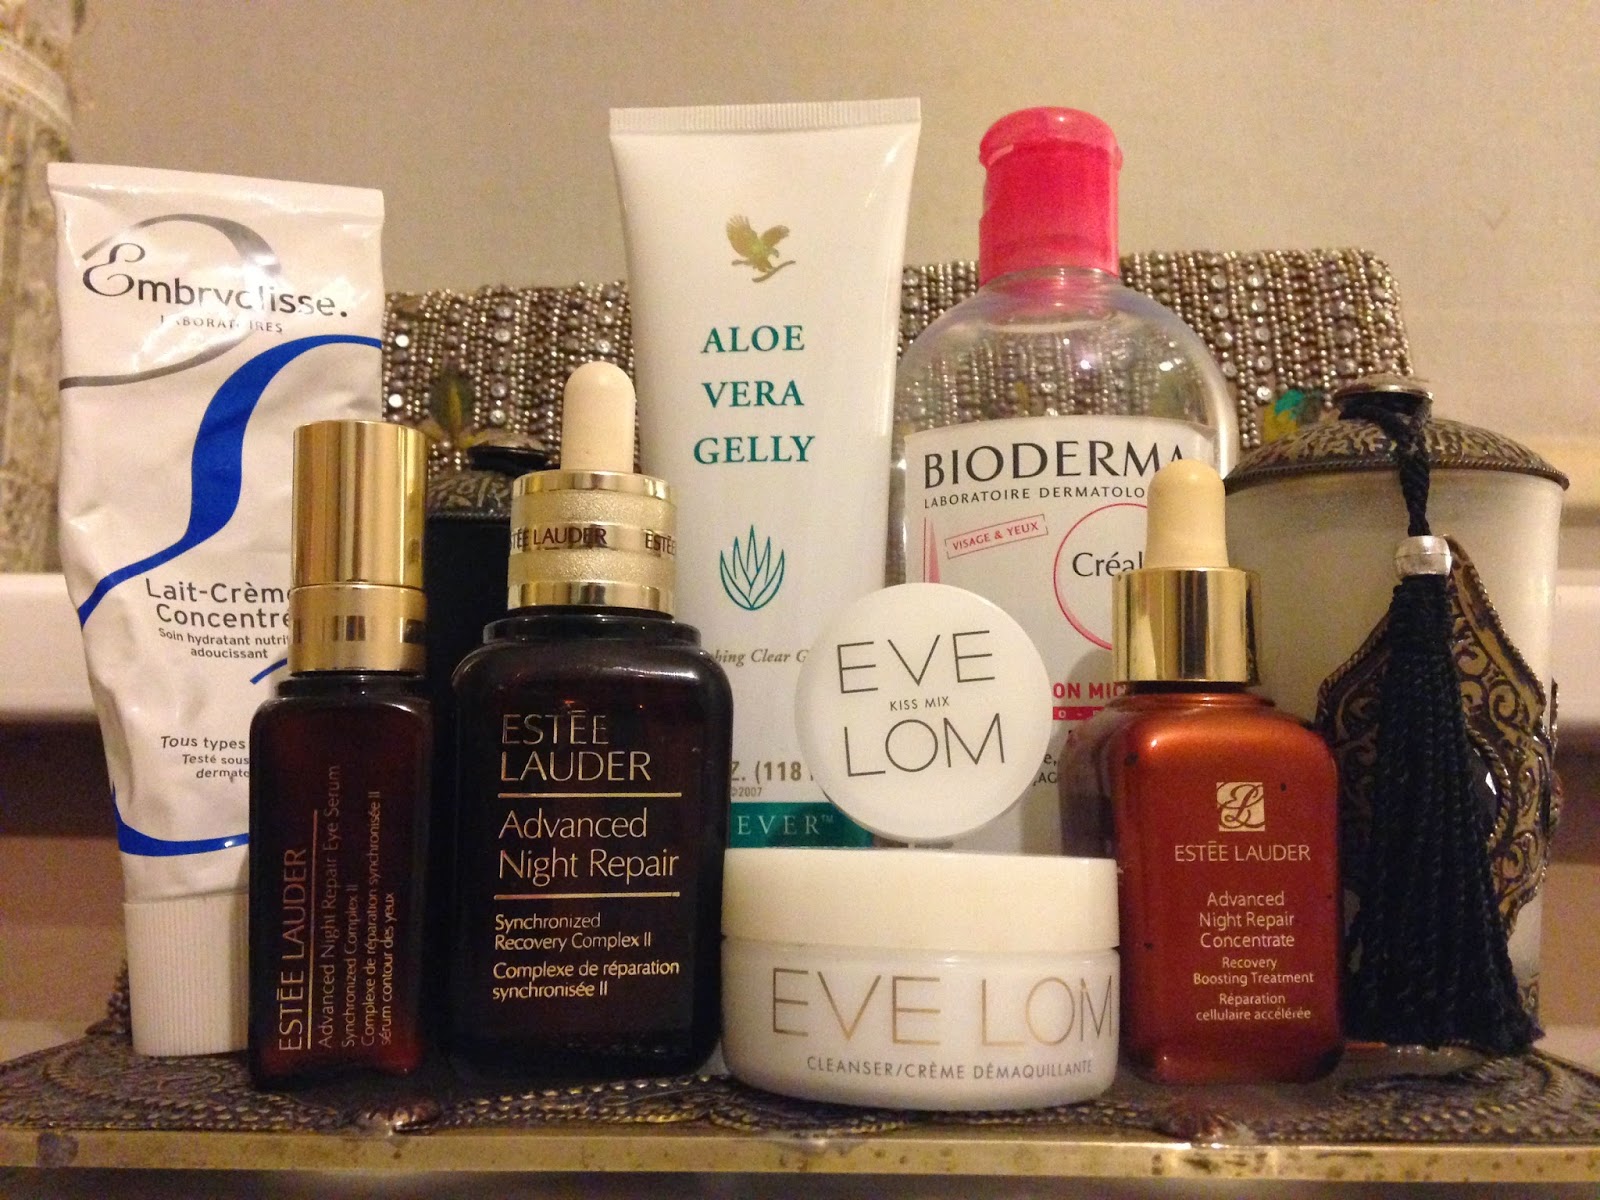
1. Bioderma Cleanser

When I take my make up off, as usual I get pretty OCD. I feel like I need every last grain off, so I do it in steps. Amongst the rest of my routine I cleanse with this before to take off my make up, and then once more when everything is off just to be sure. So yes, I need I practically drink this stuff! It's a great make up remover, and it's known for its water like properties which doesn't irritate the skin or leave any residue. I use this on clients too because I know its something I can use on everyone without worrying if someone will react.

2. Eve Lom Cleanser

I'm the type of person who needs to wash their face to feel like its super squeaky clean, I can't stand just using a make up removing wipe on its own - not only are they no good for your skin, but they leave behind residue and don't actually take away everything whilst leaving your skin dry.
This cleanser does exactly the opposite of that list, your face feels so nourished after using it as it doesn't strip your skin of every natural oil. It's a balm product which you warm up in your hands and rub into your dry face - this is why I remove make up with Bioderma first, so that I'm not literally rubbing make up into my skin! (yuck!)
Once its all over, you can use the muslin cloth to wipe away the product and anything it takes off, I do this with lots of warm water and then finish off with a splash of cold to close the pores and pat dry.


3. Advanced Night Repair, Concentrate and Eye Serum

If I had to pick a holy grail product, this would be it, year on year!
This is my secret weapon, it literally repairs my skin, I pat it into clean dry skin and let it dry up and then moisturise on top. Perfect skin saviour! I also have the more concentrated version which is far more expensive as you are meant to use it for a fixed period of time (around 21 days) every 3-4 months, whereas the normal night repair can be used daily.
Under my eyes, I use the eye serum from the same range as a prevention, and to retain moisture there, The skin under our eyes is very thin, this is one of the reasons we tend to see those blue/green veins, or we see that discolouration and shading around the eyes which look like eye bags - we call that staining. Using a serum type product will slowly help to prevent sun damage, and fill those crepey lines under the eye. On another note, if you are suffering from a troublesome under eye area, the number one thing I always suggest is .... WATER! Get glugging! The source of your problems is most probably dehydration.

4. Aloe Vera Gel

This gel is something I use on especially on days where I've been wearing make up for so many hours, and my face needs to be rescued, it instantly cools my skin and awakens it because its so refreshing. I also use it after a laser treatment rather than clogging up my skin with other products. It's a thick gel consistency which I layer on and let soak in, before I sleep I'll literally plaster it on and in the morning my skin feels like it's had a good watering! A tip on choosing an aloe gel product is to check the actual content of aloe vera, aloe vera gel and aloe vera juice are two different things... you want GEL not juice, the gel is where all the nutrients are held and preserved, the juice is normally just drained away..also check the type of aloe leaf used, there are over 500 types of aloe leaf but a heads up is to look for Aloe barbadensis!


5. Embryollise Cream

This has been my go to moisturiser for I'd say around two years now, its marketed as a primer as well as a moisturiser and I can see why. It leaves your skin feeling quite lifted and almost plump once applied and has no strong fragrance. It's the perfect moisturiser in my eyes and another essential in my kit!

6. Eve Lom Kiss Mix

I alternate my lip products quite often and theres always about three different brands in my handbag at any one time! There's nothing wrong with good old vaseline or an aloe lip product, but I've been drawn to this one over the winter months, it's got a peppermint smell to it, which isn't my favourite of fragrances, but I don't mind too much as it does the job just as the tin says!


So there you have it, my daily face products! xXx


Saturday 3 January 2015

FAVOURITE SERIES: NUDE LIPSTICKS


Favourite Nude Lipsticks:


MAC Viva Glam II - Pinky brown nude

MAC Velvet Teddy - Warm Brown Nude 

MAC Modesty - Neutral Brown - Great to work with a heavy smokey eye

Loreal Pink Beige - exactly as the colour describes! - A barely there effortless nude

Rimmel Kate 03 - Pinky Brown - Your lips but better!

MAC Hue - Sheer nude - Good when layering colours

Make Up Forever Rouge Artist N13 - Pink Nude - Pretty weekend pink

MAC Freckle Tone - Skin tone nude


Friday 2 January 2015

#NYE Make Up 2014

Happy New Year you beauties!
Here's the make up deets from my New Years Eve look!

I went for full contouring to make sure it lasted al night..

BROWS
ABH dipbrow in Chocolate, brow wiz in brunette and #hdbrows palette in vamp

EYES
MUFE transition colour 41, MAC brown down to darken the crease, MAC pigment in Gold Stroke on the lid and under, inglot gel liner on top & bottom waterline, shroom eyeshadow to highlight brow, YSL faux cils mascara, and huda lashes in Samantha 

FACE
Kryolan tv paint stick to highlight, and camouflage palette to contour, Mac select cover up concealer on top (we're going full coverage tonight!)
Illamasqua School of Make-Up Art Rich Liquid foundation with skin base applied with a beauty blender, set with RCMA translucent powder, Ben nye Mojave palette to bronze and shroom to highlight.

LIPS
MUFE Aqua lip 16c, YSL Rouge volupte lipstick in no.10


Friday 26 December 2014

Asiana Bridal Show - Birmingham @asianatv


We're just about ready to get started with preparations before the next dose of the biggest Asian Bridal show in the UK - Asiana Bridal Show London! 
So before I get swamped in make up, face charts and team get-togethers (so not complaining!) I wanted to share with you the shenanigans of the Birmingham show!

The Nina Ubhi Institute was the Make Up sponsor of the show, which means we were solely responsible for every model on the Catwalk looking the part, at every second!
It may have been just one day, but the show has taken weeks of preparation from Nina Ubhi, myself, and the Nina Ubhi Team. 

My role was joint Head Make Up Artist for a team of over 20 artists. The make up concept was created by Nina Ubhi herself, and my job was to ensure the make up of each model was consistent and just as planned, as well as support each of the artists along the way.

We had weeks of training which was so much fun! When the weekend came, we all travelled up to Birmingham for final preparation which included a Catwalk rehearsal.

We set up shop in the Egbaston Cricket Stadium by 8am and eagerly awaited our models! 
By 10am our models were ready to get going with their first dress rehearsal!
There were three Catwalk shows in total, 1pm, 4pm and 7pm, each was an hour long and all the artists were backstage making sure every model looked the part in between outfit changes.

The atmosphere backstage was just buzzing, it was such an adrenaline rush to get the girls ready against the clock, I managed to sneak out for a couple of minutes to see the girls on the stage and boy did they look amazing! That's the thing about Asian outfits, after the make up, the hair, the jewellery and the outfits the glam-o-meter is just through the roof!

If you're getting married next year or even just fancy a glam day out, head down to the next show in London on February 8th 2015. I'm hoping to give away a few tickets nearer the time, so I hope to see you there!


Thursday 11 December 2014

Battle of the Blender! @beautyblender


Once upon a time I wasn't much of a fan of most make up sponges, but that was way before the beauty blender craze began!


One thing I always stand by, is never falling for the hype over particular products. Now and again when browsing social media, you will notice some products  posted over and over on your stream. These products are backed up by top Make Up Artists and Beauty Bloggers but unfortunately, some of them do come form sponsored YouTube videos, and paid Instagram posts.

As always, in order to make my own judgement, I began yet another research journey. My blending sponge search!
The first I picked up was a dense sponge from the International Make Up Artists Expo in London.

I have to say, I was quite pleased by the blending capabilities of the sponge, although the only time I did use it whilst wet was with a solid cream stick by Kryolan (TV Paint Stick).
The time that I did try it with a normal liquid foundation, I found it was almost separated the foundation. I have oily skin, so I don’t need any added assistance with that!

The second set of sponges I went for was the Real Technique Miracle Complexion Sponge. The reason I went for this without hesitation, was because I am an avid user of the Real Techniques brushes, and know that the Pixiwoo girls would have put just as much effort into creating this product as they did with their amazing brushes.

This sponge is one I use often on clients, in fact I have an army of them in stock, they are very affordable, and do the job well! They were cleverly developed with a flat side and a more pointed side for pinpoint precision.

Sometimes I prefer using the sponge dry, but have found when I do use it wet, it out preforms the unbranded sponge I bought from the Expo by miles! The finish it gives is smooth and even, its one I know I can pull out of my kit knowing it will do the job how I envision.

They say save the best till last, and this time I have to say, my cynicism about the Original Beauty Blender hype has been put to bed, after trying lots of ‘imitation’ brands, I have come to the conclusion that this product is worth every penny of the £16 I spent on it. 

It blends out liquid and cream concealer to perfection! I don’t apply my day to day foundation with this, or even any of the others. I prefer the really buffed in finish for my day look, and find that less product is wasted this way too. Maybe I will do a post on my favorite foundation technique soon!
I do however, use the sponge wet when I am going for a full, contoured, evening look to press in my foundation over heavy contouring.

Back to the beauty blender..
 Out of all three, this is the one I prefer to use when wet.
The sponge expands but still holds the dense texture. The pointed edge fits perfectly into the under eye area and inner corner. Beauty Blender have actually just released a mini version which will be perfect for that under eye area.


For someone like me, who really needs her products and tools to withstand the constant use, washing and disinfecting, wear and tear is at the top of my list to review.

If you look at the picture below you will instantly see which product has passed this test for me.
Both the unbranded version and real techniques version both have started to split and come apart, for me that’s a real put off as not only does it make your kit look quite shabby, you can’t get the same use out of them. As I mentioned, I have a collection of the miracle complexion sponges and they have all turned out the same. My vigorous cleaning may have had something to do with it, but I don’t think there’s a better way to get the product out when washing. 


The beauty blender however, has stood the test of time and hasn’t split at all, even through all my cleaning!


  Which is your favourite?
xXx

Sunday 16 November 2014

Custom DIY Lip Palette

I love a DIY project, and I did put out an Instagram video on my latest invention, a custom lipstick palette.

As a Make Up Artist, time is usually of the essence, and wasting valuable minutes searching through a very large bag of lipsticks which all look the same, to find the colour I wanted just wasn't working. So I decided to depot them into a handy palette. I am all for palettes in any case, so this was a no brainier.

Another reason I wanted to do this was so that I could just scrape a small piece out onto a mixing palette and work from that rather than the lipstick tube, that itself is more hygienic but also, this way I can spray the entire palette down with 98% Alcohol after each use.


Go to my Instagram page @sharonmarwaymua for little video!


I had lots of people asking how I did this so I thought I would share the step by step with you all.

The empty palette I used was from MAC, I decided on this one purely because with my pro discount it worked out well.
PRO: The palette has a see through lid and generally seems very sturdy.
CON: The palette doesn't have as many pans as some of the others.

Other palettes I was considering using were:
  • The Japonesque 32 well palette - 
    • PRO: This has more wells than the MAC palette. 
    • CON: The lid closes shut so you can't see the colours inside without opening it, and also it was working out at a higher cost

  • Z Palette with empty pans - 
    • PRO - The major pro here was that this would allow me to switch up my palette depending on the job as the pans would be removable rather than fixed like the two other options. 
    • CON: The cost of the empty pans, plus magnets, plus the palette itself worked out more. 

There are hundreds of You Tube videos out there, which explain this but hopefully reading this will save you time watching all of them to find the best method (mainly because I have already done that part for you)
Here's the step by step:


1. I sanitised all my equipment using 98% Alcohol
2. I laid out and ordered all the lipsticks I wanted to depot in front of me.


3.  I cut off about a third of the lipstick and put it into a sanitised spoon

4. I hovered the spoon over a candle being careful not to let the flame touch the bottom and watched as the lipstick melted.

5. I took the spoon off the heat as soon as about 90% of the lipstick had melted and I could still see a piece which was hard, this way I was sure the lipstick didn't over heat. Over heating the lipstick can ruin the texture, so be careful.

6. I slowly poured it into the well - I mention slowly because as the lipstick reforms and solidifies, it will increase in size so do this in portions.

7. I have a number of lipsticks which I have never been used, probably because they were impulse buys like Nicki Minaj's Limited edition Pink Friday lipstick by MAC, so with these I custom melted other lipsticks in to make a wearable colour I liked. My palette has around 5 custom colours in it, I even managed to make something which is very similar to MAC's Velvet Teddy!

8. After all the lipsticks were in, the whole thing was quite a mess so I cleaned up using a Q-tip and Alcohol again and flattened out any that didn't have a flat surface.


And that's it, my well researched, tried, and tested method.
Do tag me in any posts/pictures where you try this, I'd love to see!
And if you would like yo know the exact colours I have in my palette, just let me know :)


xXx


Sunday 9 November 2014

Velour Lashes @velourlashesofficial

Sometimes we just need a short and sweet review, so that's exactly what I have for you....

I picked up my Velour Lashes at the IMATS earlier this year, they were literally sold out of almost everything by the time I got there which says it all really! We were served by one of the lovely Velour Lash girls, it might have even been Mabel Lee but it was so busy we had to rush through.

Onto the make up talk..

So I was recommend by the girls to pick up the Naughty Me lashes -according to my eye shape, which is pretty much a medium sized almond shape.

The lashes themselves have quite a thick band, usually I'm not a fan of a thicker lash band because they can be quite hard to put on as they aren't as flexible but these surprised me!
I think its mostly down to how tactical you are with the lash glue, I'm quite practised with lash glue timing so I think that helped - it has to be the right consistency before you even think of applying them.

The main thing I like about these lashes is that they look super full once they are on, typically we all know a bit of eyeshadow/liner along the lash line can instantly make your lashes look fuller. Not sure if you remember the Aishwarya Rai Loreal Mascara advert which kicked off a lot of talk not he blogger scene about the exaggeration on a mascara advert.

I've worn these lashes four times in total since I bought them and they are still in pristine condition, most lashes would wilt after that many uses or even have some of the individual lashes come away but that hasn't happened.

I would recommend to really look after the lashes, because after all they aren't unbreakable and a decent amount of care is needed.

My tip is not to get mascara on them
As soon as you are done with them, slowly peel away any glue on them
Always apply glue to the lashes and not over the lashes once they are on your eye, glue belongs on the lash line where you can't see it, not on top where its visible if you look down.

All in all heres my rating:

Value 9/10 - They aren't the cheapest of lashes but you have to weigh out the amount of wears you could get from them, and like i mentioned thats down to how well you look after them!

Packaging 10/10 - Love the packaging, they are fully secure in the box and aren't going to get squashed whilst travelling, its also really cute looking if you wanted to have it on display at your vanity.

Quality 10/10 - Its instantly noticeable that these are high quality, thing I look out for are that false shine you get from cheap quality and the lash fall out - neither of which applied to my pair!

Tag me on instagram or comment here if you have used Velour lashes!


xXx


Sunday 2 November 2014

#Halloween Make Up


I had so many make up ideas for Halloween this year, I am going to have to save them for next year I think!
I decided to go for a cracked Ventriloquist doll, I wanted to keep those 'pretty' elements in there but add a touch of horror,  though I don't think I have quite mastered a selfie which is quite scary enough yet!

Let me know if you like the look, product details are listed below!

BROWS - I muted out my brows with NYX Jumbo Pencil in Milk, and then used my normal Anastasia brow brush to fill them in with a deep purple shade eyeshadow from Inglot, I then tidied them up with Illamasqua Rich Liquid Foundation.

I then went on to the EYES, for this I went for a smokey eye which was abit abstract to compliment the purple brows. In the crease I went for MAC Magenta blended out into the brow bone (which I kept matte) and then in the corner I blended Shadowy Lady by MAC into the Magenta, I kept building over that until I was happy. For the mobile eye lid I went over it with Blacktrack gel liner as a base and then used Shadowy Lady to buff out the edges into the Magenta. To finish I went over with a larger, clean blending brush to melt everything together!
I added Ardell Demi Pixie Lashes and Avon Aero mascara in Black, for the lower lashes I added lashings of mascara, but I also went in with a Carbon by MAC and drew in thick lower lashes with an angled brush to give that fullness, Inglot gel liner in the inner lower water line and upper waterline to get that really black eye and then to finish, I added a good few layers of the Magenta in the inner corner to really make it bright.

Then I moved onto the FACE, I started with Illamasqua Rich Liquid Foundation and then went onto cream contour. Under the eye, I exaggerated an under eye highlight to really lift the cheek like a doll of course! To do that I used Mac Full coverage foundation in nc30 to get that really 'plastic' flawless face, I added some of that under the cheekbone too, just to lift that area out. For the cheekbones I went in with a Kryolan Supra Colour blended out and then to set it, MACs eyeshadow in Brun with a fluffy brush. To replicate those doll-like cheekbones I followed my natural cheek hollow and then exaggerated under the cheek to make it look fake. Over that I went in with Illamasua blush in Tremble, literally on the cheek but keeping within the contour lines I had just created. For the nose, I went over with the same eyeshadow.

On the LIPS I blotted out my natural colour with my foundation and drew in my new false lips which were much smaller and narrower.

I set everything, with a translucent powder by RCMA, just because those cream products were super heavy on my usually normal oily skin!

And then it was onto the final part, the cracks! I was actually quite apprehensive about this bit, because essentially if I messed this bit up it would have ruined what I had done so far. But I just went for it, with the thought that cracks aren't perfect and are never the same so it wouldn't look so bad even if I thought it went wrong!
I went in with a liquid liner with a felt tip and started my cracks in between my brows and then drew more from there until I was satisfied. I went over the lines with Carbon e/s to darken them up and really try to make it look like the holes had actually fallen in. I even followed the lines from the head over my eye make up and matched up the line on the other side of my eye. I then went in and attempted to create that recognisable ventriloquist jaw, this is usually the bit which moves up and down so I made the lines bait darker and thicker to look deeper.
Then, using my Jumbo Pencil in Milk on a flat definer brush I followed those lines to highlight them and make them look 3D, I also added a bubble on my lip.

After cleaning up and darkening areas, I was finally done! All in all, it took about an hour to complete - bearing this was the first time I attempted it and I hadn't really planned the products I was going to use.


This one was taken on my Cannon Camera so the colours are a little more 'true' than on an iphone


xXx


P R E V I O U S P O S T S