
Nail Salons charge for removing Shellac Manicures which I just don't agree with, when my Shellac was ready to come off I decided to do it myself and save the money...
(See my Shellac post here)
(See my Shellac post here)
I understand that the removal process gives that extra bit of business to the nail salons, but there are tutorials on cutting your own hair, doing your own pedicure so why not remove your own Shellac?
You've probably heard or experienced how difficult it is to remove a gel manicure but here's how I did mine...
WHAT I USED:
Cotton Pads
One sheet of kitchen foil, about an A4 paper size
Acetone based nail polish remover

THE STEPS:
1. Cut the foil up into 5 strips
2.I soaked a cotton pad with the nail polish remover
3. Placed it over the nail and held.
4. Wrapped one foil strip around the nail and top portion of my finger
5. Left for 15-20 minutes
6. Unwrapped the foil to reveal a bubbly surface on the nail where the gel was lifting
7. With the same cotton pad I gave the nail a little rub and the gel lifted right off
8. In some areas like those near the cuticles I had to give it an extra rub
9. Washed my hands, and I was done!

My process involved no buffing at all!
When you go to the salon this is a vital part of their process, and it's one which is very damaging, as it thins the nail.

After revealing, my nails looked unsurprisingly longer but also alot thicker and stronger. I think this may be down to the fact that the gel held my nails so strong for a about three weeks and I had no breakages, they really had the chance to grow.
Let me know if you remove your Shellac in a different way, or if you try mine!
xXx
-------------------------------------------------------------------------------------------------

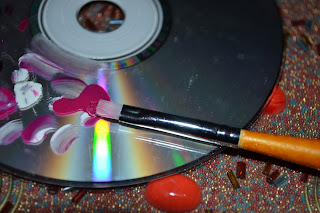
Every Compact Disc has two sides, one side with a label and a shiny/mirrored side which is the readable part.
Flip your unused discs over as we are going to be using the shiny side.

I use my old discs as a mixing palette when I'm doing my make-up or nails, it can either be wiped clean to be used again or disposed of, and best thing of all it's super slim and won't take up valuable make up bag space whilst travelling!
One of the good things about recycling your old CD's/DVD's is that they all have a hole in the middle called a 'stacking ring'. This part is really handy because it's something to grab onto-kind of like an artists paint palette.
I use them for liquids such as foundations or concealers..
 Or as a Palette for Nail Paint when I'm creating Nail Art...
-------------------------------------------------------------------------------------------------
I want to share with you a little tip I picked up from Mario Dedivanovic (@MakeupbyMario). If that sounds like I know him, unfortunately I don't, but what I do know is that he is an amazing Make Up Artist and he is more recently known for being the Make Up Artist for the one and only Kim Kardashian.
If you're like me and as you enter Winter your skin lightens, but your not quite ready to pull out the lighter shade of your foundation so you mix two different shades to match you then I hope this post will be helpful to you.
Problem:
When applying make up we tend to use the back of our hands as a palette, whether it be for testing a colour, dabbing off the excess of a product or mixing mediums and this can get really very messy.
Solution:
Old CD's/DVD's!
These days every gadget seems to come with an installation disc, with the rate at which we now buy gadget after gadget before you know it you're left with a huge stack of discs that you don't need.
On the other hand you might be more familiar with a pile of CD's that don't play anymore because they are scratched..yes we are all guilty of not putting the CD back in the case and just shoving it in the car somewhere!
...so why not recycle?
On the other hand you might be more familiar with a pile of CD's that don't play anymore because they are scratched..yes we are all guilty of not putting the CD back in the case and just shoving it in the car somewhere!
...so why not recycle?

Every Compact Disc has two sides, one side with a label and a shiny/mirrored side which is the readable part.
Flip your unused discs over as we are going to be using the shiny side.

I use my old discs as a mixing palette when I'm doing my make-up or nails, it can either be wiped clean to be used again or disposed of, and best thing of all it's super slim and won't take up valuable make up bag space whilst travelling!
One of the good things about recycling your old CD's/DVD's is that they all have a hole in the middle called a 'stacking ring'. This part is really handy because it's something to grab onto-kind of like an artists paint palette.
I use them for liquids such as foundations or concealers..


What will you use your old CD's for?
xXx


http://demopragmatic.info/pkb-akan-panggil-menag-yaqut-masalah-saran-peningkatan-ongkos-haji/
ReplyDelete